
Patent Drawing Reference Numbers: How to Place Numerals and Lead Lines
How to number parts in patent drawings: what 37 CFR 1.84(p) and (q) require, numbering schemes that survive revisions, where to put numerals and lead lines, and how to keep them matched to the description.
Patent drawing reference numbers tie each part in a figure to the words that describe it. An examiner reads them in both directions: every number in the drawings must be named in the description, and every number in the description must point to something in the drawings. The rules are in 37 CFR 1.84(p) and (q), with examiner practice in MPEP 608.02. This guide covers how to choose the numbers, where to put them, and how to keep them in step with the text.
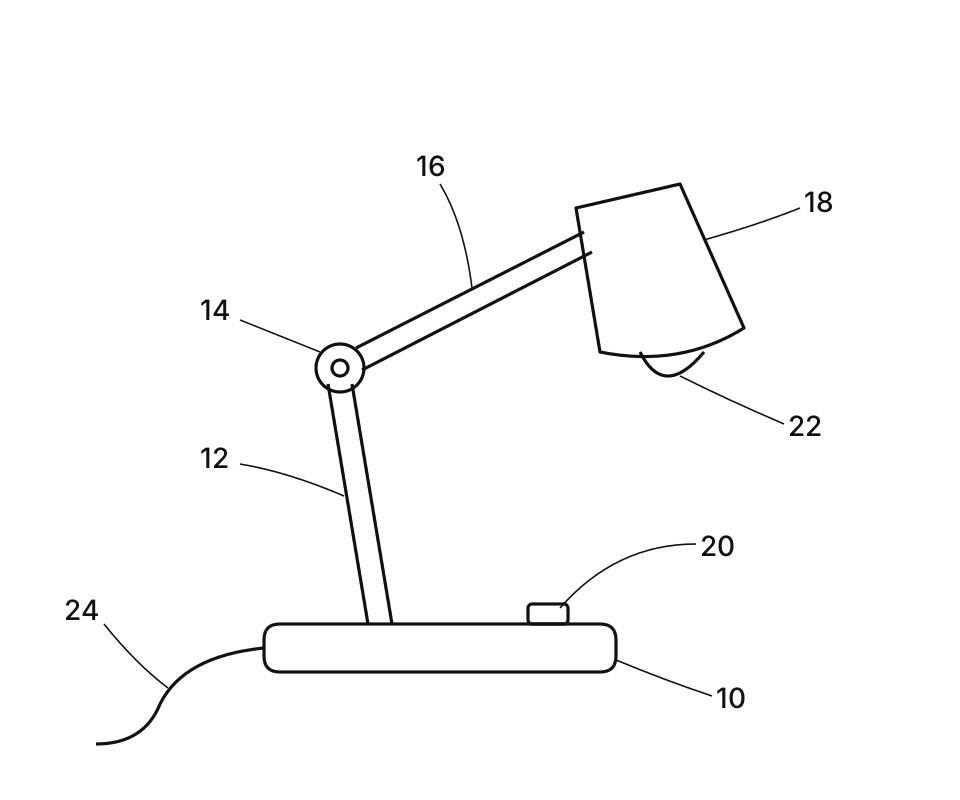
| Numeral | Part |
|---|---|
| 10 | base |
| 12 | lower arm |
| 14 | joint |
| 16 | upper arm |
| 18 | lamp head |
| 20 | switch |
| 22 | bulb |
| 24 | power cord |
What the rule requires
- Plain characters (1.84(p)(1)). No brackets, quotation marks or circles. Write them so the sheet doesn't have to be turned to read them.
- Size (1.84(p)(3)). At least 0.32 cm (⅛ inch) tall, and kept off close or complex detail. On a hatched or shaded area, clear a blank space around the numeral.
- One part, one numeral (1.84(p)(4)). A part keeps its numeral in every figure, and a numeral never names two parts.
- Match the description (1.84(p)(5)). Numbers in the drawings appear in the description, and numbers in the description appear in the drawings.
- Lead lines (1.84(q)). Each numeral connects to its part with a lead line that starts next to the numeral, ends on the part and is as short as possible. Lead lines never cross. The only numerals without one are those placed on the surface they name, which are underlined.
- Arrows (1.84(r)). An arrow on a lead line can point to a whole assembly (freestanding) or a surface (touching the line). Use them only where the meaning is clear.
The rule says nothing about which numbers to use. That part is convention, and good conventions save work later.
Choosing the numbers
Count in even steps. Number parts 10, 12, 14, 16 and so on. If a revision adds a part between 12 and 14, it can take 13 without renumbering everything after it. Start at 10 rather than 1, so numerals are never confused with figure numbers.
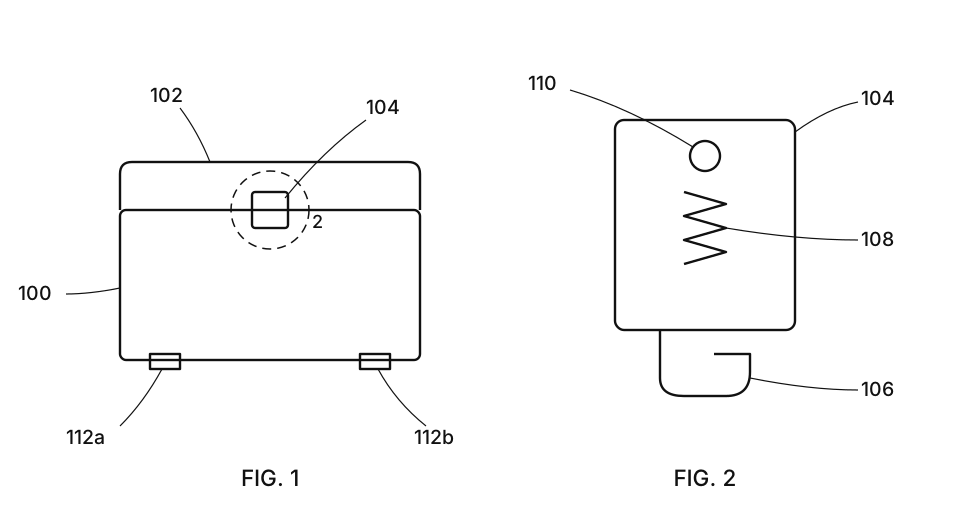
Use hundreds for figures or assemblies. In a longer application, give each figure or major assembly its own hundred: the housing and its parts are 100, 102, 104; the motor assembly in FIG. 3 is 300, 302, 304. A reader can tell at a glance where a part is first shown. A part shown again in a later figure keeps its first number.
Use letters or primes for similar parts. Two identical feet can be 112a and 112b. A modified form of part 14 in a second embodiment can be 14′. Either way, the description should name each one ("feet 112a, 112b").
Number method steps separately. Flowchart steps are usually numbered S101, S102 or 202, 204, 206, and the boxes of a block diagram take the same series as the system they belong to.
Where to put them
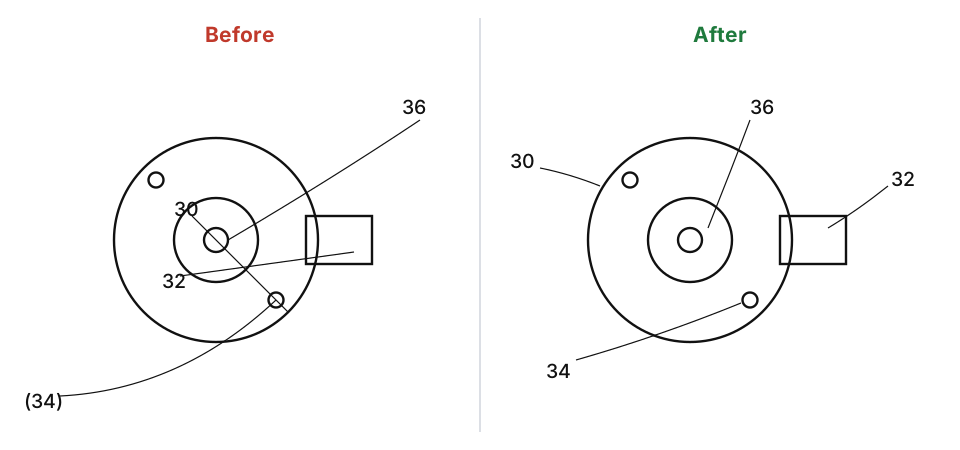
- Outside the outline when you can. A numeral inside a part competes with its lines. Put it in clear space just outside and run a short lead line in.
- Fan lead lines around the figure. Place numerals around the figure in rough clock order, so each lead line takes the shortest path in and none of them cross.
- End the lead line on the part. It should touch the line or surface it names. A lead line that stops in empty space, or ends on the boundary between two parts, leaves the examiner guessing.
- Keep the same size and orientation. All numerals on a sheet are the same height and read the same way up as the figure.
- Leave room for revisions. A sheet crowded to the margins has nowhere to put the numeral for a part added after an office action.
Keeping drawings and description in step
Most numeral objections come from editing. The description is revised after the figures are drawn, and a part is renamed, merged or dropped in one place but not the other. Before filing:
- Make a parts list like the table above, one row per numeral, and check every row against both the drawings and the description.
- Search the description for each number. A number that never appears in the text has to come out of the drawings, or the text has to name it.
- Check the reverse direction. Every "spring 108" in the text needs a 108 somewhere in the figures.
- Check across figures. The same part should keep the same number in every view, and no number should land on two different parts.
- Use the same name every time. Calling 108 a "spring" in one paragraph and a "biasing member" in another isn't forbidden, but it invites a question.
If an examiner objects after filing, the fix is a replacement sheet with the numerals corrected, plus a matching amendment to the description where needed. Neither may add new matter, so a part that appears in neither the original drawings nor the original text can't be numbered in later.
Numbering drawings in PatentStroke
On paid plans and one-time purchases, PatentStroke's numeral editor works on any line-art figure. Click a part to place the next numeral, drag the label to clear space, and the lead line follows. It flags lead lines that cross and labels that overlap, and copies the numerals out as a parts list for checking against your description. Numerals print at the size the rule requires on every sheet you export. To check numeral height and lead lines on drawings you already have, run them through the figure checker. More on making patent drawings from photos, sketches and claims is on the home page.
Frequently asked questions
How big do reference numbers in patent drawings have to be?
At least 0.32 cm (1/8 inch) tall, under 37 CFR 1.84(p)(3). View numbers (FIG. 1) and sheet numbers must be larger than the reference numbers.
Can two parts share a reference number?
No. Under 37 CFR 1.84(p)(4) one reference character never names two different parts, and the same part keeps the same character in every view. Similar parts can share a base number with a letter or a prime, such as 112a and 112b or 14 and 14′, as long as the description names each one.
Do reference numbers have to appear in the description?
Yes, in both directions. 37 CFR 1.84(p)(5) says numerals not mentioned in the description must not appear in the drawings, and numerals mentioned in the description must appear in the drawings. A mismatch either way is one of the most common drawing objections.
Should reference numbers be circled or put in brackets?
No. 1.84(p)(1) requires plain, legible characters, not in brackets or quotation marks and not enclosed in outlines such as circles.
When is a reference number underlined?
When it sits directly on the surface or cross section it names, with no lead line. 37 CFR 1.84(q) requires a lead line for every other reference character.